4.2 Obtaining an identity token
Obtaining an identity token is a two-stage process. First, you must request an authorization code; once you have this code, you can exchange it for an identity token.
4.2.1 Generating a PKCE code verifier and code challenge
If you are using PKCE, you must generate a code verifier and code challenge. each time you request an authorization code and identity token.
The PKCE code verifier and code challenge are used to request the authorization code.
-
Generate a cryptographically-random key.
This is the code verifier.
The code verifier must be a high-entropy cryptographic random string using the following characters:
[A-Z] / [a-z] / [0-9] / "-" / "." / "_" / "~"
The minimum length is 43 characters, and the maximum length is 128 characters.
-
Generate a SHA-256 hash of this key, then encode it using Base64 URL encoding.
This is the code challenge.
Important: Base64 URL encoding is slightly different to standard Base64 encoding.
See the Protocol section of the PKCE standard for details of requirements for the code verifier and code challenge:
Example PowerShell script for generating a code challenge from a given code verifier:
$code_verifier ='TiGVEDHIRkdTpif4zLw8v6tcdG2VJXvP4r0fuLhsXIj'

# Hash the code verifier using SHA-256
$hasher = [System.Security.Cryptography.HashAlgorithm]::Create("sha256")
$hashOfSecret = $hasher.ComputeHash([System.Text.Encoding]::UTF8.GetBytes($code_verifier))

# Convert to Base64 URL encoded (slightly different to normal Base64)
$clientSecret = [System.Convert]::ToBase64String($hashOfSecret)
$clientSecret = $clientSecret.Split('=')[0]
$clientSecret = $clientSecret.Replace('+', '–')
$clientSecret = $clientSecret.Replace('/', '_')

# Output the results
Write-Output ("`r`nThe code verifier is: `r`n`r`n$code_verifier")
Write-Output ("`r`nAnd code challenge is:`r`n`r`n$clientSecret" )

# Wait for a keypress
Write-Host "`r`nPress any key to continue...`r`n" -ForegroundColor Yellow
[void][System.Console]::ReadKey($true)
4.2.2 Requesting an authorization code
You must request an authorization code from the authentication service before you can obtain an identity token.
-
From your website, post the following information to the MyID authorization URL:
https://<server>/web.oauth2/connect/authorize
For the standalone authentication service, this is:
https://<server>/web.oauth2.ext/connect/authorize
-
client_id – the ID of your system; for example:
myid.openid
-
scope – set this to one of the scopes listed in the AllowedScopes parameter of your appsettings.Production.json file; for example:
openid
-
redirect_uri – set this to the URL of the page on your website to which the authorization code will be returned. This must be the same as the URL you specified in the appsettings.Production.json file.
-
response_type – set this to code
-
code_challenge – if you are using PKCE, set this to the PKCE code challenge you generated. This is the Base64 URL-encoded SHA-256 hash of the random code verifier you created.
-
code_challenge_method – if you are using PKCE, set this to S256
-
state – this value is returned in the redirect, allowing you to persist data between the authorization request and the response; you can use this as a session key.
-
acr_values – an optional parameter that allows you to pass a space-separated list of values. Currently, this supports:
-
logonmechanism:<logon_mechanism> – allows you to select which logon mechanism to use. Use the following values:
Value Logon Mechanism appsettings
passphrase Password Logon EnablePassphraseLogin smartcardmcs Smart Card Logon EnableCardLogin fido FIDO Basic Assurance
FIDO High Assurance
EnableFido2LoginBasicAssurance
EnableFido2LoginHighAssurance
authcode Authentication Code EnableAuthCodeLogin windows Windows Authentication EnableWindowsLogin The relevant authentication mechanism must be enabled in the Logon Mechanisms tab of the Security Settings workflow in MyID, and must not be overridden with a false value in the Properties section for the selected client in the appsettings file.
For example:
acr_values=logonmechanism:authcode
If you provide this setting in an URL, you must URL-encode the : in the parameter: use %3a as a substitute; for example:
acr_values=logonmechanism%3aauthcode
-
-
login_hint – an optional parameter that allows you to provide the logon user name when using the Authentication Code logon mechanism. The Username or email address field on the Authentication Code Login dialog is pre-populated with the value you provide here.
You must URL-encode the logon user name; use %20 as a substitute for a space. For example:
login_hint=susan%20smith
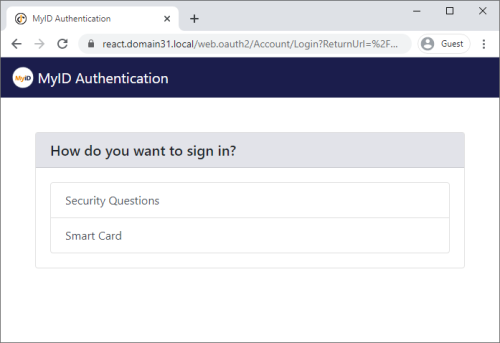
When you post this request, the MyID authentication service prompts you for your user credentials. The available methods of authentication depend on how you have configured your system; the same methods are available for authentication as are available in the MyID Operator Client. (Although note that you can disable logon mechanisms for each client listed in the web.oauth2 application settings file; see section 4.1.2, Editing the configuration file.)
If you are using the standalone authentication service, only FIDO is currently supported as a logon method.
If the EnableSelfService option is set to true (see section 4.1.2, Editing the configuration file) the MyID Authentication screen also displays a Manage My Credentials link that allows you to launch the MyID Self-Service App to manage your credentials (for example, changing your security phrases or resetting your device PIN) without completing your authentication. You must have the MyID Self-Service App installed, and the MyID Client Service app installed and running, to use this feature.
Note: If there is only one authentication method available, this stage is skipped. This also means that you are not given an opportunity to use the Manage My Credentials link.
-
-
Complete the authentication using your method of choice; for example, security questions or FIDO.
Note: You may need to ensure that the MyID Client Service is running on your PC; for example, smart cards and VSCs require the MyID Client Service.
If you configured your system to require consent using the RequireConsent parameter, the end user must allow your external system to access their information on the MyID authentication service:
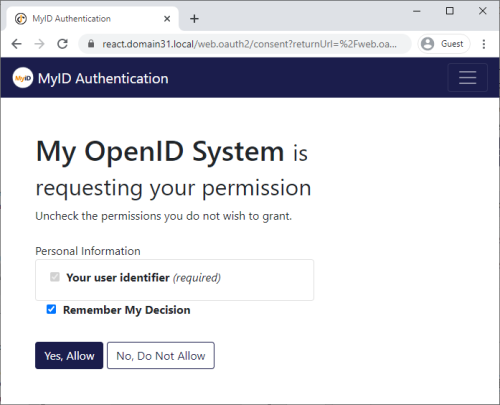
Note: The name displayed on this screen is the ClientName parameter you set up in the appsettings.Production.json configuration file.
-
Capture the code parameter that is returned to the page you specified in the redirect_uri parameter.
This is your authorization code, which can be used once to request an identity token. If you need to request another identity token, you must first request another authorization code and go through the user authentication procedure again.


4.2.3 Requesting an identity token
Once you have an authorization code, you can exchange it for an identity token.
-
Post the following information to the MyID token URL:
https://<server>/web.oauth2/connect/token
For the standalone authentication service, this is:
https://<server>/web.oauth2.ext/connect/token
-
grant_type – set this to authorization_code
-
client_id – the ID of your system; for example:
myid.openid
This must be the same as the client ID you used to request the authorization code.
-
code_verifier – if you are using PKCE, set this to the code verifier you created.
Note: Do not use the Base64 URL-encoded SHA-256 hash (the code challenge) – use the original plaintext value. The server compares this value to the encoded hash you provided when you requested the authorization code.
-
client_secret – if you are using a shared secret, set this to the plaintext of the client secret you configured for the authentication service.
Note: Alternatively, you can combine the client_id and the client_secret and post them as a Basic authentication header; for an example of this, see the Requesting an access token section in the MyID Core API document.
-
code – set this to the authorization code you obtained from the server.
-
redirect_uri – set this to the URL of the page on your website you specified when you requested the authorization code.
-
-
Capture the id_token that is returned.
The identity token is in the standard JWT format. You can inspect the token manually at jwt.io or use a variety of existing libraries or middleware to extract the identity information from the token.
For example, the openid scope returns the sub claim in the payload of the identity token:
"sub": "5d3eac85-fa64-4891-b98a-52412b0c585d"
This is the subject ID of the end user, as stored in the UserAccounts.ObjectID field in the MyID database.
See the information about the AllowedScopes parameter in section 4.1.2, Editing the configuration file for details about other claims that you can request.
Note: You must set the AlwaysIncludeUserClaimsInIdToken parameter to true to allow claims other than sub to be returned in the identity token.